|
Textured Backgrounds
A lot of levels by new authors do not have the textured backgrounds working. This article will briefly explain how to get a working textured background in your level.
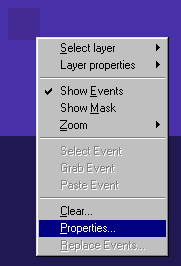
Load up the level you want to add a textured background to. Switch to Layer 8.

Now bring up the Layer Properties window. You can do this either by clicking the layer properties button on the layer toolbar ( ) or by right clicking inside layer 8 and selecting the "Properties..." option: ) or by right clicking inside layer 8 and selecting the "Properties..." option:
Once inside the layer properties window, check the checkbox marked Texture mode. Some options will now be grayed out while others will become available. Don't worry, that is meant to happen.
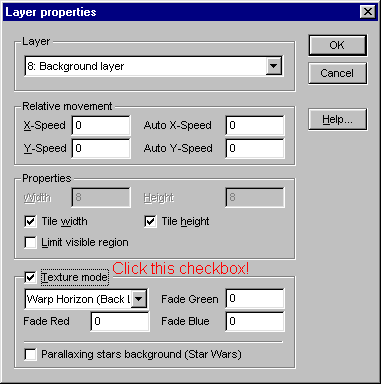
Now, you can configure a little how you want the textured background to look. The following parameters are available for your use:
X-Speed: This sets how fast the textured background will scroll by when you move through the level horizontally, on the left to right axis. If set to 0, it will remain motionless. If set to a negative number, the textured background will scroll by at a negative speed, causing it to move in the same direction that you do. The farther the number you input is from 0, the faster the textured background will move when you move.
Y-Speed: This sets how fast the textured background will scroll by when you move through the level vertically, on the up to down axis. If set to 0, it will remain motionless. If set to a negative number, the textured background will scroll by at a negative speed, causing it to move in the same direction that you do. The farther the number you input is from 0, the faster the textured background will move when you move.
Auto X-Speed: This sets how fast the textured background will scroll by horizontally regardless of whether you are moving or not, thus simulating a "wind" effect. If this value is set to a positive number, the textured background will always move to the left. If a negative number, it will always move to the right. The farther the number you input is from 0, the faster the textured background will move.
Auto Y-Speed: This sets how fast the textured background will scroll by vertically regardless of whether you are moving or not, thus simulating a "wind" effect. If this value is set to a positive number, the textured background will always move upwards. If a negative number, it will always move downwards. The farther the number you input is from 0, the faster the textured background will move.
Tile width: Leave this checked unless you know what you're doing.
Tile height: Leave this checked unless you know what you're doing.
Limit visible region: No effect on textured backgrounds.
The dropdown box with "Warp Horizon (Back Layer)" selected only has one option available, so ignore it.
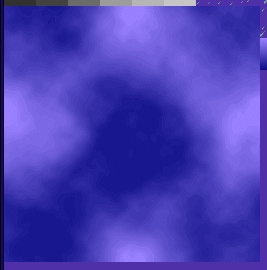
Fade Red/Green/Blue: In 16-bit color mode, textured backgrounds will always fade away in the distance to a single color. These three values determine what color the textured background will fade away to, by choosing how much of red, green and blue will be in the color. They have minimum values of 0 and maximum values of 255. A few quick examples to get you started:
- 255/255/255: Pure white.
- 0/0/0: Pure black.
- 64/0/128: Bluish purple.
- 160/64/0: Orangish red.
- 0/128/0: Forest green.
Here are some more good examples you can use for your backgrounds. (by Douglas R. Jacobson)
Parallaxing stars background (Star Wars): If you check this box, little stars will appear in the distance of your textured background, useful for nighttime levels.
Exit the layer properties window. You're almost done, now all you have to do is choose the tiles used for the textured background. Most tilesets should have a ready made textured background ready to select and place into layer 8, like so:
("Marble Garden Day" by Spaztic)
Unfortunately, some tilesets are not quite as simple to use, forcing you to search through them for bits and pieces. Here is a demonstration of this using Beach.
And finally, some tilesets (such as Inferno or Castle) do not have textured backgrounds at all. Always make sure you have the ability to make a textured background before you start doing so.Added on: 2 March 2005 23:09. Made by Violet CLM.
|
|