
|
| Compiling the Tileset | ||
Congratulations! By now you’ve drawn everything the tileset needs, made all the palettes it needs, made a mask, you’ve got everything the tileset needs and all that’s left is to turn it all into a proper tileset file. Here, have this smiley as a reward!  In case you haven’t guessed yet, this section will explain how to compile all your work into a working Jazz2 tileset ready to use in JCS. But before I carry on babbling, here is the final part of tileset making!
|
| Tweaking Before Compiling | ||
|
Before you actually start compiling the tileset there is something you must do first. This might sound crazy, wait, this WILL sound crazy but whether you like it or not it really is important. Before you compile your tileset you need to open up a brand new tileset image and rearrange all the tiles you’ve drawn so far inside it. What does this mean? Well, open a new image, make it a grid, load your tileset palette into the image and start again, copying and pasting all the tiles from your other tileset image into the new one.
Why am I doing this? For ease of use, there is absolutely no way that any person is able to draw all the tiles for each part of the tileset together without forgetting any. At some time or another you would’ve forgotten to draw a certain tile, had no space left to place it along with the other tiles of its kind so instead just shoved it into some random spot where you had space. It happens to everyone, but if you don’t place it along with the other tiles of its kind some level maker is going to search everywhere for the tile giving him a very hard time in making the level. This is the last thing you want, because level makers very rarely choose a custom tileset unless it is extremely high rated, and even if it is they will think twice if it’s hard to use. People that already make tilesets should know that getting someone to make a level with your tileset is near impossible, it rarely happens (I would guess that about 5% of all custom tilesets made are actually used by someone else than the person that made the tileset) and the thing that people dislike the most is if the tileset is hard to use.
When arranging a tileset, you need to start with all the most commonly used tiles at the top and end with the tiles rarely used. Below is a guide you can follow that shows the different categories you would arrange the tiles in (number 1 being at the top of the tileset and number 10 at the bottom).

|
| Compiling a Tileset in JCS | |||||
|
Here it is, compiling a tileset. Before you can actually compile the tileset there is a small something you must do. JCS will only load tileset images out of a special directory, so make sure you place both your tileset image and its mask image inside the ‘Tiles’ directory inside the directory Jazz2 is installed to (Default path is ‘C:\Games\Jazz2\Tiles’). JCS also only loads 256 colour LBM, BMP, ANM or PCX files, so if you’ve saved your tileset as another format make sure you rename it to one of these formats when copying it into the ‘Tiles’ directory (Mine has over 40mb of PCX and BMP files already ).
A new window will pop up, firstly showing a progress bar of JCS building the tileset piece by piece. It might not look complicated, but all the things it’s currently busy doing is pretty incredible. When it’s done it will show a small bit of info on the tileset (Number of tiles and size in kb), just press the OK button and close the tileset organizer because your tileset is finished! You can now open it in JCS and make as many different levels with it as you want; allow me to congratulate you on a job well done!
|
| Compiling Errors | ||
If you made the tileset while following the instructions on this website you shouldn’t get any errors. However, errors during compiling are possible but are never too hard to fix, mostly these errors occur when something about the basics of tilesets isn’t right. Your tileset will not have any errors if it has all the following correct:
“JCS's tile set compiler always checks your tileset to see which colours are used and which aren't. The colours that you do not use are automatically replaced with lighter and darker shades of the colours you use most frequently in your tile set. This will make your tile set look better when it is shaded in Jazz 2.” So there you have it, JCS will automatically add a set of colours to your tileset it uses for the lighting special effects in the game. The lighter colours are used for that huge beam of light that follows the character when it is running, and the darker colours are used when the ambient lighting of the level is set to values below 100%. The part JCS doesn’t tell you is that it NEEDS these colours and if it can’t find enough empty tile spaces it will give an error during compiling. As long as you keep a few empty unused palette entries you will be fine. Personally I like to keep the top row of the tileset empty so that I don’t have a space of empty tiles interfering with the space I use below the Jazz2 palette.
|
| 24-bit Tileset Nightmare | ||||||||||||||||||||||||||||||||||||||||||||||
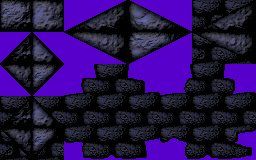   So you’ve made a tileset using the 24-bit drawing method and everything is fine during compiling, but as soon as you open the tileset in JCS you are shocked to see that huge chunks of the tileset you’ve drawn are gone! Upon closer inspection you will see that the problem is actually to do with the transparency colours, when you loaded the palette all your near-black colours have turned into black because of colour reduction which removed them from the drawing. I’ve stopped keeping count how many times this has happened to me. In fact, I would say that only two of the tilesets I’ve made using the 24-bit drawing method haven’t had this bug happen. Fixing this is easy though; just replace all these black colours with a near black colour in your palette. Palette entry 95 out of the Jazz2 palette is as close to black as you’ll get (it’s a very dark purple), so just replace all the black with this colour. The problem with this is that the colours look exactly the same to you, the human eye cannot see the difference between the two colours and you have no idea what parts you’ve actually changed and what parts you haven’t. Well, thanks to a great feature in Paint Shop Pro there is still hope for us in fixing this bug, in a matter of seconds even! I’ll use my Corrupted Sanctuary tileset as an example for this section, it’s so dark there’s bound to be an error somewhere. You can download a beta version (the latest version before I fixed the bug) of it HERE (Note: No longer available -BlurredD) so you can follow the instructions and try it out for yourself too; it’s a little hard to explain with images.
|
-=Tutorials=-
[Part 5: Making the Mask|Part 6: Compiling the Tileset|Part 7: Final Extras]
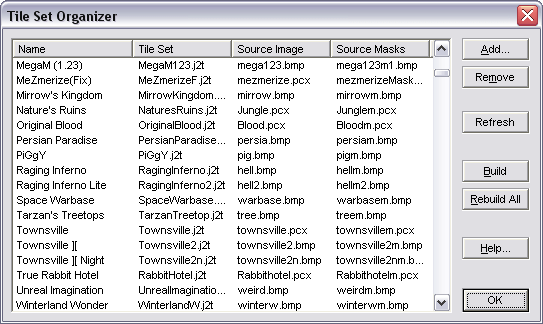
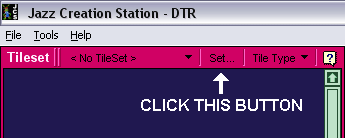 You are now ready to compile your tileset, open JCS and press the ‘Set…’ button in the tileset view menu to open the Tileset Organizer.
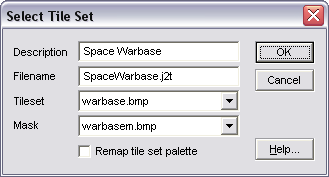 The ‘Select Tile Set’ window is where you add all the different details about your tileset. I’ll explain each one of the boxes in a bit more detail:
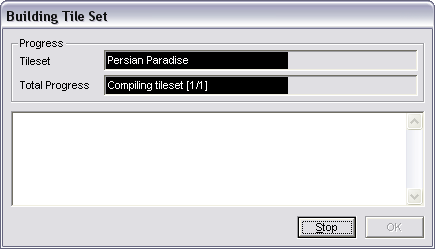

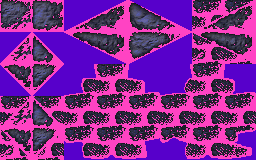 Firstly, open the image in Paint Shop Pro. We need to make the black visible and easy to spot so we don’t miss areas of the tileset. Edit palette entry 0 (the first entry of the tileset, pure black) to pink (255 red, 0 green, 255 blue) by going to ‘Colors --> Edit Palette…’. Wow, what a difference! With all the black changed to pink there is absolutely no way you can miss those colours, even someone who is colour blind can see that!
 ) in the tool palette along the left of Paint Shop Pro.
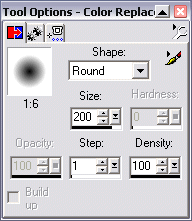 Next thing you need to do is make its brush big; and I mean really big. Open the tool options and set the size of the brush to as big as it can get, the bigger the brush the more you can replace in a single drag of the mouse.
 You also need to set the correct colours for the tool to use. The primary colour is the colour it will replace with and the secondary colour is the colour it will replace. Set the colours to palette entries 0 and 95 so that it will look like the styles example in the top-left.
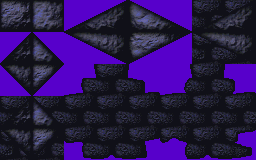 All that is left to do now is to use the brush on the image and see the pink magically disappear to a black that won’t be replaced by the transparency colour in JCS. At this point your tileset is ready to be compiled again, make sure you change the pink in palette entry 0 back to black when you're finished. If you don’t there will be a nasty pink surprise waiting for you in JCS to remind you to change it back.