Battle Game A
First of all, as you might have already seen, this is only a "Battle Game A" strategy page. It was the only level that we could find a volunteer for. There should be more to come. If you're interested in making some of this, you can get a little credit if you send content in a private message to one of the administrators. (Beauman, this is the part you were supposed to make. ;P —Ed.)
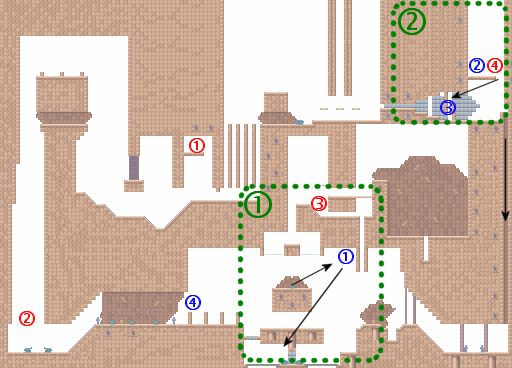
Okay everyone, first let us begin by explaining what the nice little drawings on the level map beneath mean. Blue stands for YES places. In fact red stands for a YES place as well; however, when entering these zones you should be cautious, as there are no carrots within reach. The green-dotted areas are the most important areas of the level, so focus on these! Of course, we're trying to teach you the good old "HOME: 10 - VISITORS: 0" theory.

| The starting position I've used here is at the start of the arrow pointing to the blue "1". However, you can start from anywhere and still try to follow the pattern. I'm not saying this is the way to win, but it can help. | Okay, as I explained before, red places are also good places to look for your opponent or to prepare for their arrival around there. If you have low health, however, you better stay away from these areas, or stay there for very short periods of time. |
| 1.) Okay, the first step is optional. As you may know, this is where the main carrot resides. You "can" shoot it down if you wish, making it appear as non-existent to a rushed player. Smarter ones will just check down and eat it. So, it's optional, because there are dumb people as well as smart people. | 1.) This spot is so-so. Chances depend on the player you're facing. I've known players who have kept me stuck there for HOURS (okay, minutes) as I had low health, and the only thing you can do then is die. So avoid getting stuck there when you're on low health! |
 2.) The second step is to get the yellow seeker powerup. Camping here sucks for others because you keep them from renewing their main weapon. 2.) The second step is to get the yellow seeker powerup. Camping here sucks for others because you keep them from renewing their main weapon. |
2.) Be careful once taking this way down. I've absolutely loved camping here because your opponent has no control over his or her fall. They can buttstomp all they want, it'll just make them unable to shoot briefly. Stay out of this spot if you are low on health! If you really want to get out of jumping, you can go down again on the right side and blow yourself out of the hole using RFs in one of the weapon rows next to the bouncer powerup. |
| 3.) This is the main camping area. Everybody loves to use it! Although there is a carrot here, it's not a good idea to stay for too long, as you are bound to run out of ammo, which will give your opponent a huge advantage. | 3.) I never ever could figure out why cerain people enjoy camping here just for the carrot. It makes them extremely vulnerable to any attack, unless you have godlike reflexes. You can avoid having them see you get closer by taking the left vine in the main arena. |
4.) This step isn't very complicated. It is just another place to look for your opponent, knowing that he or she previously took the bouncer way. You can shoot as many seekers in here as you like, just to make sure. |
4.) Whatever you do, don't go here with low health! |


