


|

|

|
|
JCSref
First time visiting the jcsref website? Check out the welcome page for information.
Browse through the latest news to see what's going on with JCS and level editing in general.
Take a look at this month's feature articles for some of our best content.
Been a while since your last visit? Find out what's new in the latest updates section.
What have people been talking about on the site? Find out in the latest comments section.
Get to know the staff members of jcsref and find out how to contact us.
Our links section is full of great JCS resources. If you can't find it here, you'll find it on one of the links.
|
Topics
Not really sure what you're looking for?
Want to see what all jcsref has to offer?
Check out our topics listing now!
You can use the link above, the book icon up top, or the topics tab to the left.
Search
Do you know exactly what you're looking for?
Are you trying to get information on several topics?
Give our archive search a try!
Use the link above, the magnifying glass icon up top, or the search tab on the left.
Index
Not sure on the spelling of your topic?
Need to browse through some keywords to find what you want?
Our site index is just what you're looking for!
To go there now, use the link above, the papers icon up top, or the index tab to the left.
|
|
|
|
|
|
Viewing node 3D Tileset Objects
|
|

|
|
3D Tileset Objects
Quite often people want to improve the quality of their tilesets with 3D objects. The conventional way of dealing with this can often lead to undesirable results, such as speckles and unwanted transparency. Depending on how complex your objects are, there is a process which can improve your tiles.
Before you read this, you should read this.
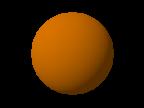
The first step is, of course, to create your object in one of the many 3D suites out there, and render it to an image file. Be sure not to use antialiasing for the edges of your objects, as this will lead to a nasty outline. Also, make sure that the background colour is different from your object's colours.
Here's an example:

Now you need to open your rendered image in an image editing program.
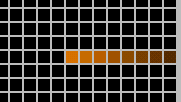
The first thing you should do is increase the brightness by a small amount. This will get rid of any 0-value black. If you are sure there is no 0-value black, you will not need to do this. You can now replace the background colour (blue, in our example) with 0-value black. This can now be used as the background colour without any transparent blotches appearing on your object.
The example comes out like this:
Now load your tileset's palette in a palette editor. First, make sure your palette has a colour gradient for your object. If it doesn't, create it in an unused area, and save the new palette back to your tileset. The gradient should range from the brightest to the darkest colour of your 3D object. Remember that this should not be 0-value black. Now, all the colours in the palette except for this gradient must be changed to 0-value black. Save this palette in a different file.
Go back to your image editor and load the palette file as the image's palette. Usually, you will have to choose between "Nearest Colour" and "Dithering". "Nearest Colour" is guranteed to produce an image that you can use. "Dithering" will create a better-looking picture, but there may be tansparent speckles on your object.

Now you load your tileset's palette using the "Mainatain indices" option. You can now put the object in your tileset.
If you want to change the colour of your object, all you have to do is cahnge the palette.
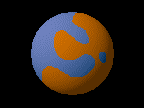
If you want to make your object multicoloured, carry out the procedure again, but put the gradient in the same position as another gradient of your tileset's palette. When you load the tileset palette, the object will change colour to that gradient.

You can now cut out the pieces and bring them together.
Flash adds: Links updatedAdded on: 15 March 2003 14:52. Made by Toxic Bunny.
|
|
|

|