|
Warps
Want to move to a location in a jiffy? Use a warp instead of walking the whole way. Besides, you don't always know where you should be. Warps are handy solutions but you should be careful using them.
Choose a section:
How to make warps
1. Open JCS with your level.
2. Go to the place you want to put your warp.
3. Right mouseclick there and select 'Select Event'.
4. Go to Gameplay -> Area and select Warp. Choose a variable in the lower right corner, e.g. 1.

fig. 1.0 - Gameplay -> Area -> Warp
You now have a warp. Ofcourse, you do have to tell where the warp is linking to.
5. Go to the place you have to come when you go into the warp.
6. Right mouseclick there and select 'Select Event', Gameplay -> Area and select 'Warp Target'.
7. In the 'ID' value you put the same number as the warp, e.g. 1.
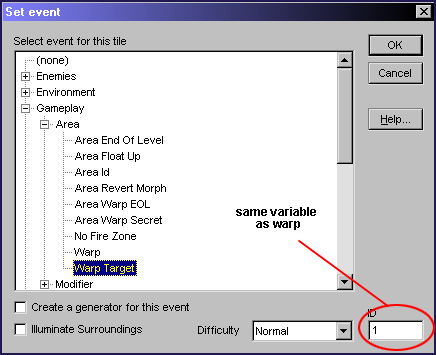
fig. 1.1 - Gameplay -> Area -> Warp Target
Congratulations, you have now made a successfully working warp.
Other things you should take care of with making a warp:
- Do not place warps next to a wall, you will get stuck.
- If you make a warp and fill in the ID, make sure the warp target has the same ID.
- Do not overuse warps or make warps the main navigation, else it would be annoying.
Multiple warp targets:
You can also place multiple warp targets instead of just one. This way you never know where you are going to warp to, good for strategy.
Coin Warps
In levels it often occurs that you need a number of coins before you can enter the warp. This is often used for bonus areas. How do those warps work?
How to make a coin warp
1. Open JCS with your level.
2. Go to the place you want to put your coin warp
.
3. Right mouseclick there and select 'Select Event'.
4. Go to Gameplay -> Area and select Warp. Choose a variable in the lower right corner, e.g. 1.
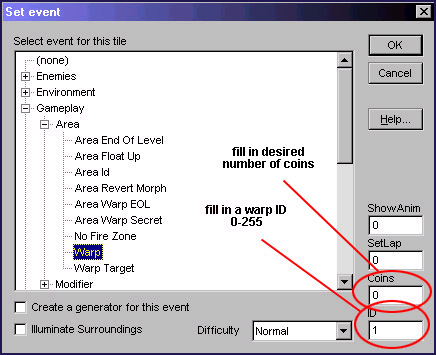
fig. 2.0 - Gameplay -> Area -> Warp
5. Fill in the number of coins you need to enter this warp, e.g. 15.
You now have a warp. Ofcourse, you do have to tell where the warp is linking to.
6. Go to the place you have to come when you go into the warp.
7. Right mouseclick there and select 'Select Event', Gameplay -> Area and select 'Warp Target'.
8. In the 'ID' value you put the same number as the warp, e.g. 1.
fig. 2.1 - Gameplay -> Area -> Warp Target
Congratulations, you have now made a successfully working coin warp.
Added on: 27 February 2003 17:25. Made by Electric.
|