


|

|

|
|
JCSref
First time visiting the jcsref website? Check out the welcome page for information.
Browse through the latest news to see what's going on with JCS and level editing in general.
Take a look at this month's feature articles for some of our best content.
Been a while since your last visit? Find out what's new in the latest updates section.
What have people been talking about on the site? Find out in the latest comments section.
Get to know the staff members of jcsref and find out how to contact us.
Our links section is full of great JCS resources. If you can't find it here, you'll find it on one of the links.
|
Topics
Not really sure what you're looking for?
Want to see what all jcsref has to offer?
Check out our topics listing now!
You can use the link above, the book icon up top, or the topics tab to the left.
Search
Do you know exactly what you're looking for?
Are you trying to get information on several topics?
Give our archive search a try!
Use the link above, the magnifying glass icon up top, or the search tab on the left.
Index
Not sure on the spelling of your topic?
Need to browse through some keywords to find what you want?
Our site index is just what you're looking for!
To go there now, use the link above, the papers icon up top, or the index tab to the left.
|
|
|
|
|
|
Viewing node Creating the Palette
|
|

|
|
Creating the Palette
There are three ways to produce a tileset with a palette. - Optimised reduction.
- Reduction to a pre-made palette.
- Creation with a pre-made palette.
You can read about optimised reduction here.
Pre-made palettes
The first thing you should do is get Palette Suite.
Note:
"Index" is a colour position in a palette. There are typically 256 of them.
"Indices" is the plural of "Index".
"Gradient" is a set of colours in which the first colour changes gradually to the last colour. "Gradually" and "Gradient" both come from the same word, "Grade".
Now you need the default JJ2 palette. The default JJ2 colours occupy all the palette indices between 16 and 95.
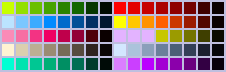
You can obtain the palette from the above image. Right-clicking on it should bring down a menu with a save option.
Fire up Palette Suite. Select File->Open from the menu and choose the image you just downloaded.
You now have all the gradients of the standard JJ2 palette. Do not move these colours. For information on what other colours JJ2 occasionally uses, click here.
Reduction to a pre-made palette
You need to look at your high-colour tileset to decide which colours you want to keep. Going from 16777216 colours to 256 may seem like a great loss, but a good tileset maker will never use more than a few thousand of those 16777216 colours.
Remember that you cannot change the default colours, so if you don't use them, you will only have 192 colours left. On top of that, the first two colours are used for transparency, and JJ2 requires a few more shades for lighting. It is recommended that you only use the colours from index 96 to index 255, giving you 176 colours.
Also bear in mind that when you compile your tileset, all duplicate colours will be removed.
Your image editor should have a colour picker that will allow you to see the RGB (Red, Green and Blue) values of the colours in your tileset. Switch to the "Edit Palette" tab in Palette Suite, select a palette index higher than 94, and put in the RGB colour. You can do this by moving the scrollbars up and down. Or, you can click on the red green and blue numbers below and type in the RGB values.
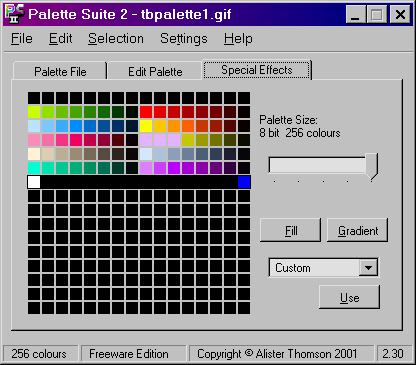
If you have any gradients in your tileset, you will want gradients in your palette. If the gradients are small, they need only occupy a few palette indices, say 3 or 4. If they are large, they should occupy several, though you should not use more than about 32 inidices for one gradient. In order to add a gradient to your palette, put the first and last gradient colours in the first and last palette indices you want the gradient to occupy, like so:
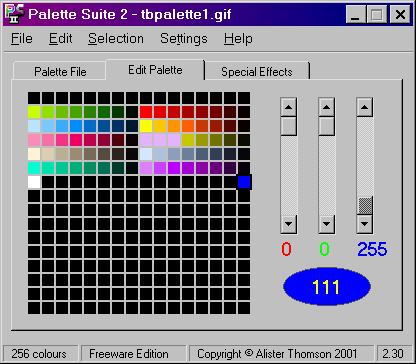
Switch to the "Special Effects" tab. Now select all the indices. An index is selected if it has a black box around it. Make sure that no other indices are selected. You can change whether or not an index is selected by clicking on it. The palette should look something like this:
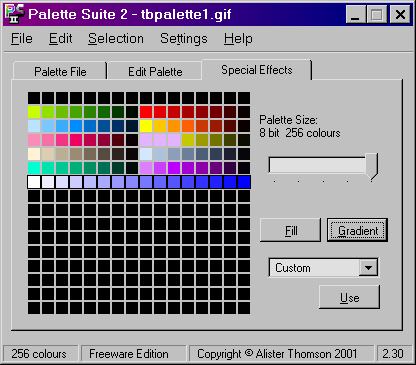
Click the gradient button. Voila!
If you have two very similar colours that need to be distinct, make sure that they are both on the palette.
In order to apply the palette to your tileset, first save your tileset to a different file in case anything goes wrong. What you must do now will depend on your image editor. In PSP, select Colors->Load Palette from the menu. Select the palette you have saved. Select the option "Nearest Colour Matching". Click OK. Your tileset is now ready to be compiled in JCS.
Creation with a pre-made palette
Reducing to a pre-made palette involves creating colours based on what you have used. Creation with a pre-made palette involves creating colours based on what you plan on using.
The great thing about creating a tileset in 8-bit is that you are guaranteed that what you have created will be what your compiled tileset will look like.
Conclusion
Now that you have a tileset with a palette you can compile it.
Make sure that the "Remap Tileset Palette" option in the "Select Tile Set" window is NOT checked. Otherwise you will lose the careful positioning of your colours.
Flash adds: I've updated the links that didn't work because of the address change.Added on: 1 March 2003 14:02. Made by Toxic Bunny.
|
|
|

|