|
Event Theory
This article offers no example levels, but I do attempt to supplement the discussion with helpful illustrations. As much of these techniques should become fairly intuitive, you are encouraged to follow along with it in JCS, taking time between sections to try out some numbers other than those given in the article to see what sort of results you get. If you think "I wonder if… works too," stop reading the article and go try it out. If it doesn't, review the logic and see if you can figure out why not. At least until the end, most of the contents of this article are highly systematic, and the chances of your hitting on numbers that idiosyncratically don't work as expected are relatively slight.
What Is An Event?
This section is mostly terminology, breaking down the loose category of event and naming some variation. There are two basic things placing an event can add to a level: objects and zones. (Connection to actual JCS event categories with these names is decent, but by no means perfect; for instance, "H-Pole" is definitely a zone, not an object.) Objects usually have visual representations (although Pulze Light and Destruct Scenery are excellent counterexamples in two different directions), behaviors, and can be in some way directly interacted with. Zones have no independent behavior and instead affect other things in their vicinity.
I will remain ambivalent on how this, along with many other things, is actually represented in the source code, as it's not really relevant and I "don't" have the source code *winks*, but we can say for the purposes of distinction that objects have their own code, whereas zones exist only in the code of objects, usually player objects. No Fire Zone, for instance, does not destroy bullets that touch it; rather, let us assume that part of the firing routine in the player code says that if the player's current zone is a No Fire Zone and it is a Multiplayer game, the fire key will be ignored. Most zone interaction code is handled by player objects, but there are various exceptions… Bubbler bubbles, for instance, detect being in Wind zones, and Ricochet certainly isn't tested for by player objects.
There are (a maximum of) 256 events in JJ2, and each of those events (that work) contains code that says at least "when I am placed, either this tile is such and such a zone, or such and such an object is created here." (The order of events is visible in JCS.ini or the OEM JCS, and has nothing to do with the categories you see in the Select Event window.) Zones do not concern us, and they can be little tested, but objects are pulled from an Object List, which can't be directly viewed. To use a concrete example, Object #4 is the Seeker Missile, but Event #4 is a zone, specifically Hook. Event #4's code does not say "create the object that has the same number that I do" but rather "this is a Hook zone." Similarly, event 21 is Trig Rock, but object 21 is the smoke ring from Caterpillar.
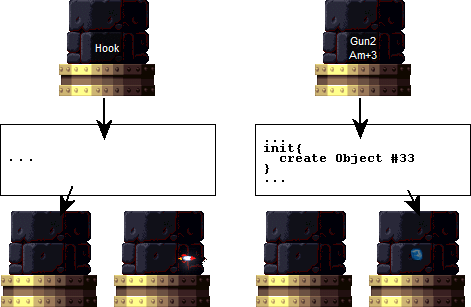
fig. 1.0 – Events #4 and #33. The latter creates an object, but the former doesn't, and so must be noticed by the player object's own code.
How do we know what Object #4 is, then, if Event #4 doesn’t create it? There are two ways to access the object list directly, which make up the bulk of this article: crates and the generator object.
Crates and Sprites
Most crate events have three parameters: ExtraEvent, NumEvent, and RandomFly. RandomFly is irrelevant to this discussion, as is the Gem Crate event, which has none of this and contains only ever gems. For all other cases, the ExtraEvent parameter actually specifies which object (not event) from the Object List will be contained inside the crate, and of course NumEvent specifies how many of that object, up to fifteen. If you place, say, a Carrot Crate, and set ExtraEvent to 4 and NumEvent to 1, destroying the crate will spawn a single Seeker Missile object, Object #4. (In this article I am using spawn for cases where objects come into existence as a result of other objects, and create for cases where objects come into existence directly from events placed in JCS.) Seekers are actually an extremely simple case of crate object generation, or COG, and we'll return to crates later, but they're the simplest means of directly accessing the object list. Type in a number, save and run, open the crate, and if there's an object for that number it'll come on out. Hooks, text zones, etc., will never come out of a crate.
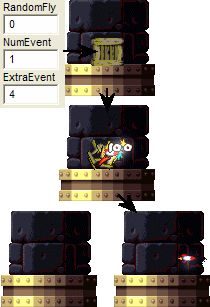
fig. 2.0 – An object inside of a crate. Crates always spawn objects, regardless of the code of the corresponding event.
At this point it seems important to mention another side of objects: Sprites. Zones are always invisible, but objects tend to use sprites, even if the sprites are blank. (Many of the more basic gameplay objects (gems, etc.) have their sprites loaded into game memory automatically.) When you place Event #100, the code says not only "when I am active create an instance of Object #100 (Tuf Turtle)" but also "at the start of the level, load the sprites specified by the code of Object #100, if they haven't been loaded already, and then when I am active create an instance of Object #100." Regular, unmodified copies of JJ2 have many memory limits, and if you try to have too many different objects in a level, the game will load too many different sprites and could crash.
This causes a problem if an object enters into the game without being directly connected to an event. Let us say you open a 1Up Crate, ExtraEvent 100 and NumEvent 1. If there are Tuf Turtle events in the level, then the events' code will have already loaded the sprites for Object #100, and a Tuf Turtle will be spawned from the crate. However, if there are no events loading those sprites, then the game does not have access to the Tuf Turtle sprites, and instead substitutes a series of nonsense sprites from menu images and Jazz frames. The same applies to most other objects: if the proper sprites are not available, the behavior is the same, but the object looks crazy. Here is a list (albeit a very old one) of what you can loosely expect to get from the various object numbers if the proper sprites aren't loaded. ExtraEvent 21, for instance, will create a smoke ring object, but unless there's a Caterpillar somewhere in the level the sprite will be of Jazz on an airboard. Some objects also share sprites: placing a Still Turtleshell event, for instance, will load the sprites that the Normal Turtle object uses.
Ambient Sound
However, in some cases you don't want the object to exist other than in the crate, and yet you still want the proper sprites for it. My favorite example of this is Event/Object #238, Snow: it only begins snowing after the crate is destroyed. Help comes from an utterly unexpected place: Event #194, Ambient Sound. Just as JJ2 has an Event List and an Object List, so too are there a Sound List and a Sprite List. Unlike events and objects, the id numbers of objects and their sprites don't match up, and in fact the Sprite List is somewhat different in 1.24 than in 1.23.
The first (bottommost) parameter of Ambient Sound is called Sample. The event's code does two main things: it plays that sound from the Sample List, and also loads that sprite from the Sprite List, making it available for objects to use. Pyromanus has compiled an invaluable list of which ambient sounds will load which sprites, in both 1.23 and 1.24, and you can use this list to know how to ensure that sprites will be available for when objects are spawned from crates. For instance, to load the Snow sprites in 1.23 you place an Ambient Sound event with Sample 81, and in 1.24 with Sample 85. As a general rule, include two events, one with each sample, to maximize compatibility across versions. Similarly, in order to ensure that a Tuf Turtle comes out of ExtraEvent 100, rather than a jumble of other sprites, use Sample 98 (1.23) and 102 (1.24). (Then there are other cases in which you actually want the messed up spriteless objects for whatever reason, in which case, go for it! Object #42, the Swinging Vine, for instance, is that way a spriteless swinging black line, and you can't actually swing from it, so it's just cool eyecandy.)
In summary, here is how to get a Tuf Turtle from a 1Up Crate. The JCS user places Event #48, 1Up Crate, and sets parameters ExtraEvent 100 and NumEvent 1 (or whatever). On running the game, Event #48 checks its own code to see if it's a zone or an object and, discovering the latter, creates Object #48, 1Up Crate. This object, on inception, reaches into the Sprite List and grabs the Crate sprites. When it is destroyed, it spawns Object #80, Extra Live, and also (NumEvent) counts of Object #(ExtraEvent), in this case one count of Object #100, Tuf Turtle. This object in turn reaches into the Sprite List for the Tuf Turtle sprites to use, and depending on what other events are present, either finds them or doesn't. If the Ambient Sound method is used, then the JCS user places Event #194, Ambient Sound, and sets its Sound parameter to 98 (assuming this is 1.23). Ambient Sound, if placed, runs its own code to play Sound #(Sound), in this case 98, and also to load (while the level itself is being loaded) Sprite #(Sound), in this case the Tuf Turtle sprites.
Generator
As mentioned before, there is another way of accessing objects from the object list without worrying about zones getting in the way: Event #216, Generator. This is what you get when you check the "Create a generator for this event" checkbox in the event selection window. Although non-OEM JCS misleads you in every way it can into believing that generation is actually a property all events (or rather objects) share, this is not at all true. In order to get around JCS's misleading interface, let us illustrate this indirectly with Events #59 and #243; pay close attention to the uses of the terms event and object in order to avoid becoming confused.
Event #243 is not in JCS.ini by default, but can be added without difficulty, and creates an Airboard object. The event's code basically reads "create Object #243." This object is very similar to any other item, in that touching it causes its disappearance and (usually) some added effect, such as more points, increased shield time, or whatever. Moreover, like any other item, after the Airboard object is collected it does not return.
Event #59, however, known as Airboard in most JCS.ini files, turns this on its head, and appears to create a regenerating Airboard object. Instead (this is not specifically proved in this article, but you should know how to test it by the end) Event #59's code reads "create Object #59." Object #59 is an invisible object with code that states "when first created, spawn Object #243. Some set period of time after that Object #243 has been collected, spawn another one." (In single player, of course, you can speed up the time between spawnings by moving more than 31 tiles away and coming back; this, while often fascinating, is irrelevant to the article at hand.) There is no inherent property of the Airboard object which causes it to regenerate; rather, all regeneration code lies in the invisible Object #59, which is never itself collected or otherwise destroyed.
This is exactly how the Generator object works, except that it is far more flexible. Again, it is an invisible object with code that spawns a second object when first created and then spawns that object again some set period of time after the object's destruction. However, instead of always spawning Object #243 and always after the same time, JJ2 and JCS let the level maker choose which object (the "Event" parameter) and what period of time (the "Delay" parameter). Thus, when placing a generating Bouncer Ammo +3 in your battle level, you are not placing Event #34. Rather, you are placing Event #216, Generator, and telling it to spawn Object #34.
As with crates, the Generator event takes its objects from the Object List, not the Event List. For a simple test, place a generating Hook event in a level: you get Object #4, the Seeker Missile. This most basic, single-generator, single-event means of accessing the Object List is known as an SCE, which stands unintuitively for Single Combo Event due to various historical reasons. In truth, the difference between an SCE and the next major topic is not as broad as one might think, but the terminology is old and thus unshakeable.
One other thing that the Generator event does is that it loads all the sprites associated with Object #(Event). If you don't have any instances of Event #102, Lab Rat, in your level, then placing a Crate with ExtraEvent 102 will result in spriteless Lab Rat objects. However, a generator with Event 102 will know to load the sprites for Object #102.
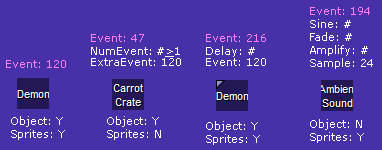
fig. 3.0 – A summary of four different approaches toward Object #120, Demon. Ambient Sound does not actually spawn the object but does load the sprites, which crates do not. Crates and directly placing the event result in a finite number of Demon objects, whereas the Generator will not. A combination of a crate and Ambient Sound will allow a Demon object to appear in multiplayer, but JJ2 will detect and eliminate any attempts through Generator or the event itself.
Is the SCE method any better than using crates? No. Rather, they're used for different purposes, as one produces a regenerating object with the proper sprites and the other (usually) does not. An SCE on its own is significantly less powerful than a crate is, but we can make SCEs very useful indeed, after a quick step back to look at another all-important series of events: Belts.
Belts and the detecting thereof
Most zones are very limited in their scopes. The Belt Left and Belt Right zones (and their cousins Acc Belt L and Acc Belt R, but we'll ignore them as they're hard to type and aren't too interesting for the purposes of this article), on the other hand, are extremely powerful, and can move most any object. I myself have compiled an enumeration of which "events" belt zones can or cannot move; note that, while I do not make the zone/object distinction in that list, its impact is pretty obvious: zones can't move, but most objects can. If you haven't played with JCS much, just shoot some food onto a belt in Labrat and you'll see their power in action. Note that some objects (Bee and Rapier, for example) are only affected by Belts when they are in certain modes, specifically attacking. The player object has similar restrictions: you will be moved by belts in some modes, such as standing, but others such as falling ignore belts entirely.
How does an object know that it's on a belt? There appear to be two sensors, or points, that an object employs for this purpose: for this article we may refer to them as the Belt Point and Speed Point, setting aside all possible alternate uses such as detecting the Hurt zone. For most simple objects (various foods, for instance), and also for the player object, the Belt Point is just (approximately 32 pixels) below the object itself. If the Belt Point is in a Belt zone, then the object knows it is supposed to move in whatever direction corresponds to the zone detected by the Belt Point. Note too from the list that some objects, particularly the falling trees, have their Belt Points in extremely odd places. Only single-tile sized objects need concern us for the present, however, so let us restrict the discussion to the player object and, say, Object #141, Apple.
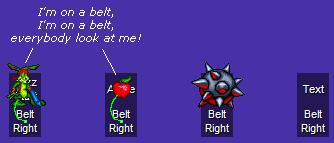
fig. 4.0 – The Belt Points of the player and Apple objects are about 32 pixels beneath them, as represented in green, and detect that they are on belts. Zones do not have Belt Points, and certain objects, such as the Spike Boll object, do not seem to be affected.
However, Belt events too have a parameter, namely Speed. How does the object know how fast to move along the belt? This is accomplished by the Speed Point. Rather than look at the specific zone (or other event) on the tile where the Belt Point is, the Speed Point only pays attention to the parameters associated with that tile. The player object is utterly sensible and has its Speed Point in the same position relative to the object as it has the Belt Point, meaning that it will always get the speed it is to move from the Speed parameter of the Belt event. Apple, however, and apparently all other objects, keeps its Speed Point directly in the center of the object, and so ignores the Belt's parameters. In order to set the speed an Apple travels, you will need to set some parameters for the tile directly above the Belt, which the Apple will be moved into. Remarkably, the tile receiving these parameters does not need to have a Belt event on it: any event at all will do. For instance, if an Apple is moving along a series of Belt zones (at default speed) and crosses into a tile with a Gem Ring event on it, with the event's otherwise-useless Length parameter set to 13, then the Apple will move at speed 13 the entire time its Speed Point is in that tile, in whatever direction comes with the Belt event detected by the farther-down Belt Point.
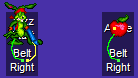
fig. 4.1 – Although player and Apple objects both have Belt Points (shown in green) about 32 pixels beneath them, the player object also has its Speed Point (shown in yellow) there, but the Apple object has its speed point at the same height as the object itself. Therefore the player object detects the Speed parameter on the actual Belt event, but the Apple object detects whatever parameters happen to be on the tile it's currently inhabiting.
Pause for a point that will become vitally important soon enough. What do Speed values mean? You may have noticed that sucker tubes with particularly high speeds can actually send you through solid walls. This is because the Speed parameters on sucker tubes and belts refer directly to the number of pixels you are moved per gametick. So if a sucker tube has X speed 64, and a wall is only 32 pixels wide, you only are stopped by the wall if your sensors detect that the area 64 pixels to your right is masked. If you're closer to the wall already, your sensor will detect that 64 pixels to the right, on the other side of the wall, isn't masked, and so you sail right on through. Belts work the exact same way: if your Belt Point is on a Belt Left zone and your Speed Point detects speed 76, your movement will be 76 pixels to the left, unless there is a wall there. However, most events don't have a parameter called Speed, so what do other objects do?
Parameters vs. Bitfields
Read this post, up until the point it starts quoting Jerrythabest, which isn't as important here. Basically, when you get down into the .j2l file, every tile in layer 4 has a string of thirty-two bits. The first eight represent the event number, 1-256, and the remaining twenty-four are the parameters and the universal settings such as difficulty (two bits) and Illuminate Surroundings (one bit). JJ2 knows exactly what to do with this string of bits, or bitfield, for each event: for instance, if a Gem Barrel object is destroyed, it creates as many Red Gems as are specified by a four-bit string, and as many Green, Blue, and Purple gems as specified by three other separate four-bit strings, for a total of sixteen bits used up by the parameters. If you look at JCS.ini, you'll notice this matches up exactly. However, changing JCS.ini would have no effect, as the interface is purely for convenience value: were you to change the .ini listing to Red:6|Green:2|Blue:7|Purple:1, that would have no effect on how the game interpreted the bitfield. Instead JCS would just be misleading, as setting Red to 18 would result in a few red gems and a bunch of green gems. Got it? Each event reads the bitfield in its own way, which we cannot really affect, and what it says in JCS is just for convenience.
Therefore, when an Apple is moving along a series of Belt events, and it comes onto a tile with some parameters set (i.e. the bitfield is other than thirty-two zeroes), it knows exactly which of those bits to interpret as how many pixels it should move, regardless of what those parameters are used for by the event in that tile or what JCS.ini says about them. If the Speed Point moves onto a Set Light event, the object will get its speed from all seven bits of Intensity and one bit of Red. It's all logically deductible from JCS.ini, so apart from this one illustration, I'm not going to provide any sort of all-inclusive map of bits to parameters on every single event and how you should know which parameters for which events will line up with belt. First eight parameter bits are belt speed; that's all you need to know.

fig. 5.0 – Some bitfields. (Not shown are the first twelve bits, which are used for event number, illumination, and difficulty.) In every case, objects on belts will interpret the first eight bits of the tile their Speed Point is on as the belt speed, regardless of what the bits are used for by the event at that tile.
What might not be intuitive, but which will be very useful soon enough, is that if bitfields exist independently of events and have no inherent meanings outside of how events interpret them, then any event can have parameters added onto it in JCS.ini to allow you access to its bitfield in JCS. If you give Event #1, One Way, its own Speed:-8 parameter in JCS.ini, then you'll be able easily to edit the relevant eight bits of that tile's bitfield, allowing for non-default speeds for moving objects. At this point, while you're still in JCS.ini, check Event 255, which does nothing on its own. Change its name to MCE Event, place it in some event category (I suggest "Area"), and give it the parameters Event:8|Delay (secs):5. What's important for belts is that the Event parameter will correspond exactly to Belt Speed. Because Event 255 has no code, this essentially allows you to set thirteen bits in the bitfield of tiles that don't actually have functional events, in case other things need those parameters. (Occasionally you'll want access to the other bits as well – you'll see why in a few paragraphs – and the principle is the same, just add more dummy parameters and call them whatever you like.)
This point should be clear, but it bears overt iteration because of how important it is. I have referred to Apples moving along and coming upon a tile with a non-zero bitfield, but it is equally possible for the bitfield to be on the tile the object starts at. Let us say that we edit the listing for Apple in JCS.ini and give it a Speed:-8 parameter. If you place an Apple event directly above a Belt Right event, and set the Speed parameter in Apple (not in Belt Right) to 64, the Apple will be instantly, on loading moved 64 pixels to the right. Thus you could have nine completely different objects appear to be on the same tile with only minimum moving: one is placed on the tile in JCS, four move from the tiles on the left using Belt Right events and internal Speed parameters of 32, 64, 96, and 127, and then four from the tiles on the right using Belt Left events. Let's call this instantaneous repositioning. (You could, of course, make all the Speed parameters 32 and have the same end result, but the objects farthest from the center would take a few gameticks more to get there.)

fig. 5.1 – Nine apples which will all appear on the same tile. JCS.ini is here edited so that Apple has a Speed:-8 parameter. This parameter may be set to anything at all for the center apple, because there is no belt beneath it and so it has no effect.
Notice that I have tried very hard to make it clear that bitfields are joined to tiles, not necessarily to events. This isn't important for zones, which can't move at all, but for objects it matters a great deal.
Let us say you place Event #183, Float Lizard, and set its Fly Away parameter (one bit) to 1. Upon initialization, the event sees that its code says that it should create a Float Lizard object. This object, on creation, checks the bitfield at the tile it appears on and sees that its internal Fly Away should be 1. Objects remember the details set for them in bitfields with them as long as they exist, so wherever you shoot the Float Lizard, it will still give off a Copter, no matter what the bitfield is for the tile it's on when you shoot it. However, it initially gets the knowledge that it should give off a Copter from the bitfield it appears on due to Event #183 – crucially, not necessarily from the tile Event #183 was actually placed.
So what? Well, there are a couple of events that are known to create objects after initialization, and thus, after they've had a chance to move, aren't there? Let's go back to Generator, and use this stuff to explain a couple observed phenomena before actually using it to create anything useful. In fact, we'll solve both of these problems before the article is over!
- You may have heard that regenerating Trigger Crates only trigger TriggerID 31. Stop a moment and see if you know why. Consider: Trigger Crates are Object #95. To make it regenerate, you place a Generator event and set Event to 95 and Delay to whatever you like. When the Generator object spawns the Trigger Crate object, it checks for the bitfield at the tile it appears on and notices the bitfield used to make the number 95: 1+2+4+8+16+0+64. The Trigger Crate object, once spawned, only reads the first bits of those, and thus gets 1+2+4+8+16 for its TriggerID: 31.
- If you've ever tried placing a regenerating (non-Gem) Crate, you know it's a bad idea. This is why crates are really only used in Single Player, and multiplayer sticks to the safe Barrels. Again, consider. What's really happening is that you're placing a Generator event with the Event parameter set to, say, 47 for Carrot Crate. However, when the Generator object spawns the Carrot Crate object, the Carrot Crate scans the bitfield at that tile and notices the bits used for 47. As chance has it, Carrot Crate also uses the first eight parameter bits to determine which object to spawn: a Carrot Crate! When you destroy it, a new Carrot Crate comes out, scans the bitfield, and determines that it's supposed to have a Carrot Crate in it. Meanwhile, because the original crate has been destroyed, eventually the Generator will spawn a new one, which also contains another, and another, and so on.
Not much can be done for the trigger crates without resorting to JCS, but there is an easy solution to generating crates that can be performed ingame and that follows the same principle as the more complex solution to come. Before destroying the initial crate (i.e. the crate spawned by the Generator object, not the Crate object), push it one tile to the left or right. The crate, on destruction, will spawn a second crate, but that crate will not have a bitfield to read (or it will have a different bitfield, anyway), and thus there won't be another crate in it and the recursion will cease. But on to JCS-level workings!
The Three-Event MCE
You may have recognized the two parameters I gave for MCE Event earlier. They're also the parameters for Generator. MCE stands redundantly for Multiple Combo Event, and is a way of getting around some of the confines that SCE imposes. (Technically speaking, both of the above examples should count as instances of SCE, as they use the same basic mechanism, but SCE usually just refers to cases where the event of a certain number produces a zone rather than an object. Note though that there are plenty of zone events which don't produce an SCE when generated, because there's no object in those spots on the Object List. Alternatively, you could distinguish between the two based on the number of belts used, with SCE using zero and MCE using one or more.) There's a lot of history attached to MCE development which we don't need to go into, but the most basic use of the MCE system is to get around the property of SCEs where they automatically load the proper sprites, and to come closer to the behavior we see with crates, where you could also get a jumble of fonts. And yet they still regenerate!
The most basic sort of MCE requires only three events, although we'll soon see that five tends to offer a lot more possibilities and regrettably is far less common. Let's illustrate with the attempted creation of Object #200, the Devil Devan Boss, one of the more popular spriteless constructions. We don't have to worry about bosses regenerating because the level ends when they're defeated. (Technically a crate would work almost as well here, but there are plenty of cases where they're not practical, so count this as a semi-practical example.) If you simply place a Generator object with Event set to 200, you'll get a normal Devil Devan Boss, because the Generator object sees that its Event is 200 and automatically loads the sprites associated with Object #200. To get around this, we need to generate Object #200 without ever placing either Event #200 or a Generator event with its Event parameter set to 200.
As it turns out, the Generator object is just as good at instantaneous repositioning as is an apple. Place a Generator event in your level and set its Event parameter to 32. Conveniently, this attempts to spawn what JCS.ini calls "DON'T USE," which is not an object and seems not to load any sprites. Place a Belt Right or Left event in the tile below it. When the level is initialized, the Generator object will move 32 pixels to the right or left instantly, based on its nature as an object, before it even gets into its own code. At that point, once it has moved, it will scan the bitfield of the tile it has landed on to see what object it's supposed to spawn. This is where MCE Event comes into it. Even if there's nothing else in that tile, MCE Event (or any other event, but this one is handy because it executes no other code and is not any kind of functional zone; at other times you might want to use One Way, Red Gem, or absolutely anything else instead) allows you to set the bits that the Generator object will use in place of the bits attached to the tile the Generator event was placed. Place MCE Event one tile directly to the right or left (depending on the belt, of course) of the generating DON'T USE, set MCE Event's Event parameter to 200 and its Delay parameter to something big, just in case. The Generator object will now know to create Object #200, Devil Devan Boss, but at no point did the game receive a notice to load the proper sprites.

fig. 6.0 – A three-event MCE. The Delay parameter on the DON'T USE Generator is never read, because the Generator object moves (Event) pixels (here 32) to the right before spawning from a bitfield, and nor is the Speed parameter on the belt, because the Generator object's Speed Point is not that far down. After the Generator object moves 32 pixels, it lands on the tile containing the null-code MCE Event. It reads the bitfield and begins to spawn Object #200 (Devil Devan Boss) at Delay 31. At no point do JCS or JJ2 realize that this is going to be an enemy and shut the whole thing down.
This three event construction – belt, generator whose Event parameter specifies how many pixels it'll be moving (up to 127), and then bitfield (attached here to MCE Event, but of course any other event would work just as well) in the receiving tile – is the essence of a Multiple Combo Event. The exact same process is used to generate any other object as well. Sometimes you'll want sprites, sometimes not, and the same principles apply here: other instances in the level or proper Ambient Sound settings. Through the MCE process you can place those functionless black Swinging Vines anywhere you like without the hassle of opening a box. This is also the best technique to place enemies in multiplayer levels. Although JJ2 will load neither enemy events nor generators set to generate those enemies, moving a generator object onto a tile that tells it to generate enemies is caught by neither JCS nor JJ2, and so you can have enemies assuming you first load the sprites with Ambient Sound. Hooray!
Obviously, although I have used DON'T USE for the above illustration, numbers other than 32 are also possible for the Generator event's Event parameter. Originally everybody used 104, which was effectively four tiles. In fact, one of the earliest uses of MCEs, before people had any real idea how they worked, was to "stack" Generator objects. Understandably, a Generator event works just as well as an MCE Event at providing the bitfield for a belt-displaced Generator object. If you move a Generator object onto an existing Generator event, you have two Generator objects on the same tile spawning the same object at the same delay. If you move another on, you have three. Etc.

fig 6.1 – Some "stacked" Generator objects. All five Generator objects end up on the same tile and will all generate silver coins at the exact same delay.
Stick to multiples of 32 whenever possible, but keep in mind that belt speed can be negative, and so if you attempt to move a Generator object 170 pixels to the left it'll move 85 pixels to the right instead. In that case, why would you ever bother using 170 for the speed value? Read on…
The Five-Event MCE
Recall the case of the regenerating trigger crate from earlier: the Generator object spawns the Trigger Crate object, and the trigger crate takes its TriggerID from the bitfield at the tile it was spawned at, specifically the same tile the Generator object was at and took its own information from the bitfield of. It should be clear that making a three-event MCE does not solve the problem either, as the Generator object and the Trigger Crate object would still get their bitfields from the same tile. The solution is identical to the earlier move up from SCE to three-event MCE, but applied twice over.
Place a Belt Right event one tile under the MCE Event, and the Belt Point/Speed Point combination will lead any object present at the MCE Event to move 95 pixels (for all intents and purposes, three tiles) to the right, where another MCE Event can be waiting – this one with the TriggerID of the spawned trigger crate. Unfortunately, the first Trigger Crate produced by this setup will have a TriggerID of 31, but all the others will have their TriggerIDs set by the second MCE Event. This limits usability, of course, but level-specific workarounds can surely be found. As for the other problem, that of generating (non-trigger) crates with useful contents, the same solution applies. Depending on the object being generated, the second movement will sometimes be some other number instead of 95, and thus negative numbers (that is, numbers over 127) may become a consideration. Act wisely.
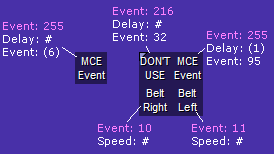
fig. 7.0 – A five-event MCE. Here the Generator event again gets its Event and Delay parameters from the bitfield on the far-right MCE Event tile, but the Trigger Crate object it generates (Object #95) gets its parameters, at least beginning the second time, from the bitfield on the far-left MCE Event tile.
In terms of Event Theory, why is it that the first Trigger Crate has the incorrect TriggerID? Internal logic dictates that just as the Generator object checks for belt and undergoes instantaneous repositioning prior to internalizing the local bitfield, so too ought the generated Trigger Crate move 95 pixels prior to internalizing the bitfield at the second MCE Event. The reason is actually rather interesting… some objects move before internalizing (e.g. Bridge), and others internalize before moving (e.g. Trigger Crate). Thus the first Trigger Crate takes its TriggerID from the same tile that the Generator takes its Event/Delay from, but by the time the second one spawns, the Generator object is already on the same tile as the second MCE Event, and Trigger Crate can get its TriggerID from that. Other objects such as Bridge, however, work "strongly" with five-event MCEs, and will get their Length/Type/etc. from the second MCE Event rather than the first, which is good because bridges are not known to need to respawn. Whence the distinction in code between movement-first and movement-second objects? Read on…
Crate Streaming
Moonblaze's The Demon Invasion is a classic in JCS/JJ2 history for a number of reasons, not least its innovative design work. One of the most interesting levels highlights the problem with the Generator object, that is, it will only spawn a second instance of its object once the first has been destroyed. This works very well for generating ammo and most other situations, but if you want to have an ever-increasing number of something, for instance enemies, this behavior becomes much less practical. However (and you may by now have noticed a pattern), event theory can get around this issue, and will allow for objects to respawn in theoretically infinite number. Note that this article, while explaining how to achieve such an effect, will not go into any detail cautioning you when not to… suffice it to say that memory should be a concern, particularly in multiplayer levels, and it is often important to find a way to dispose of these theoretically infinite objects, particularly if you have more than one source of them. Also, while a few particular formulae are here provided, what follows is substantially more complicated than the above "pure" MCE work and alternate constructions are possible, assuming a strong understanding of the underlying logics.
It should be evident enough that the basic solution to the problem is to place the objects you want spawned, for instance enemies, inside of crates. Let's say bomb crates, just because their default contents eventually obliterate themselves from memory. When the crate is opened (as the result of a five-event MCE), an enemy comes out, but the original spawned object (the crate) is by then destroyed and can spawn again. The question is then how to set up a system such that crates will self-destruct. Simplest, of course, is to set up an SCE – typically TNT or a Seeker Missile – to shoot the crate, but there will be circumstances under which this is impractical, particularly if the SCE destroys the contents of the crate as well. This is less of a problem if you're not using TNT, but then you have to wait for the SCE to respawn, which is sometimes impractical. If using an SCE is an option, do; otherwise, we use gravity and masks.
Again setting aside the issue of the very first crate to be spawned, with its unintended parameters, when a crate (or most other objects affected by gravity) is spawned, the generation sparkle appears where the Generator object is, but the crate itself begins sitting on top of the topmost mask beneath that Generator object. That is, if the Generator object is at 5,6, and the first masked tile below that is 5,10, then the crate will begin its existence at or around 5,9, depending on the exact masking of the masked tile. This is another example of instantaneous repositioning, but vertical, and also explains the varying orders of movement and internalization: objects affected by gravity internalize a bitfield prior to movement, whereas other objects (such as Bridge and Generator) do not. This is perfectly sensible, as were falling objects to internalize after movement, setting parameters on a crate suspended in the air would have no effect at all. In any case, getting back to our actual setup and moving away from theory, this means that the bitfield on the tile the crate appears to begin at (where it has instantaneously repositioned to) is utterly inconsequential.
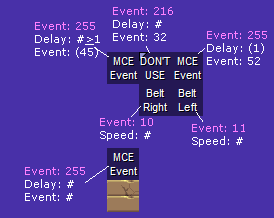
fig. 7.1 – The five-event MCE from earlier, spawning Object #52 (Bomb Crate) instead of #95 (Trigger Crate). Here, starting from the second instance, the spawned bomb crate begins at the upper-left MCE Event, gets its parameters from that bitfield (here it will spawn some number of gold coins), and then instantaneously repositions to the bottom-left MCE Event, whose parameters do not affect what the bomb crate will spawn. On the other hand, if the bomb crate were to be opened while still on that bottom-left MCE Event, and were its contents to be something that uses parameters, then it would get those parameters from bitfield associated with the bottom-left MCE Event.
Key to automatically opening crates, as you may well know already, but I will explain anyway, is that they be in falling mode. When the crate is spawned, it repositions instantaneously downward, but if that mask is removed, it will begin to fall: thus, animated tiles. Place an animated tile below the second MCE Event such that it goes between being masked and unmasked, and then below that (two tiles below if dealing with fully masked tiles) place a second animated tile, the clone of the first but with reversed masked and unmasked order. Thus, the crate will always begin sitting on top of one of the two tiles, and will fall downward when it disappears.
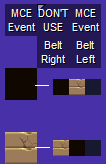
fig. 7.2 – The addition of two complementary animated tiles – I find that 1 is a good animation speed – ensures that the bomb crates will always come out in falling mode. Either a crate repositions to the top of the lower animated tile and then falls away, or it repositions to the top of the higher animated tile, falls to the lower, and then falls away. I have ceased to label the events up top because their values are not changing anymore.
This structure works for single player, and makes for all sorts of cool gimmicks, but it only works half of the time for multiplayer. Think about it. In single player, the best non-event-based way of opening a falling crate is to have a mask appear around it, for instance, a masked-unmasked animated tile at speed 70. Any crate which drops into such an animated tile, unless lag intervenes, will instantly open, single player or multiplayer. (Depending on the framerate, the contents of a crate may appear either where the crate exploded or at the first mask below it.) Those cases in which it accidentally falls through can usually be solved by placing a spring underneath so that it bounces back up and goes through the animated tile again.
However, in multiplayer falling crates also open when they land on masks. Much of the Ground Force gamemode rests entirely on this fact, but here it presents a problem. If the crate instantaneously repositions itself onto the bottom animated tile, then there is no problem and it falls once that tile animates to unmasked. However, if it repositions onto the top animated tile, then when it falls it will land on the (masked) bottom animated tile and open, which probably isn't where you want it to be. Fortunately this turns out to be trivial to solve with just a few more events. Put belt events on each animated tile and MCE Events on the tiles above them to be tested by the crates' Speed Points. The crates will get their parameters from the upper left MCE Event, instantaneously reposition onto one animated tile or the other, and then move some pixels to the side, avoiding any possibility of landing before you want them to. (This works in single player too but is arguably unnecessary there. Also if you want to be fancy you could have the two belts send the crates to different places or something… it all comes down to what you want to have happen.)
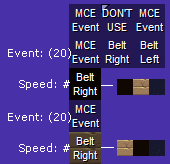
fig. 7.3 – These new belts prevent the crates from exploding prematurely in multiplayer by moving them away from the masks immediately after repositioning.
I probably don't even need to mention this at this point, but when that crate finally does open, the bitfield it's in will determine the parameters of its contents. No suggestions will be given for what to do with that detail: if you need it for something, it'll be there. Added on: 29 June 2009 01:31. Made by Violet CLM.
|
|