Making a simple level (Howto JCS)
Okay, what we're going to make is a room with a start position, an enemy and an end position. The start position is an event which is placed at the spot where you want the player to start, and the end position is an event that ends the level when it is touched by the player.
1) Start by opening the "File" menu and selecting "New". This empties all windows. (If all windows are already empty, you don't have to do this.)
2) Open the tileset menu (by clicking on "No TileSet") and select "Castle 1". Of course you can select another tileset but this tutorial will be easier to follow if you use the same tileset.
3) Now it's time to place some tiles in your level. You do this by clicking on a tile in the tileset window and then clicking somewhere in the level-editing window. The tile you selected from the tileset window should have appeared in your level. Turn "Masks" on to see what kind of tile it is. If it's solid (=black) you can use it as wall and/or ground. Turn "Masks" off again
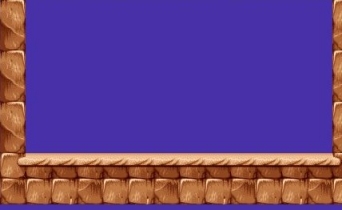
4) Experiment a little with different tiles and try to make a room which is about 12 tiles wide and 6 tiles high. Your level should look something like this:
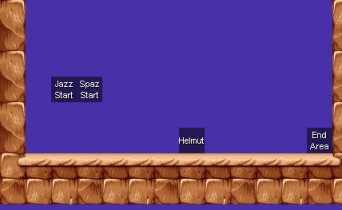
5) Now, we'll place the start pos event. Right-click somewhere at the left on an empty tile-space (Make sure, though, that there is at least one tile between the space you click on and the wall). This opens a menu. Click on "Select event". This is the event menu. Open the "Gameplay" group by clicking on the + next to it. Then, open the "Start pos" group and select "Jazz level start". Click OK. Because a level can be played with both Jazz and Spaz, you also have to put in a start pos for Spaz. Place Spaz' start pos next to Jazz'(use the same steps as above).
6) Place an enemy-event somewhere in the center of the room on the floor. Enemies are in the "Enemies"-"Bad guys" group (DUH). I used the "Helmut" enemy.
7) Next, put an "Area End Of Level" event on the floor at the right wall. It's in the "Gameplay"-"Area" group. This is what your level should look like now:
8) Save the level (in the "File" menu).
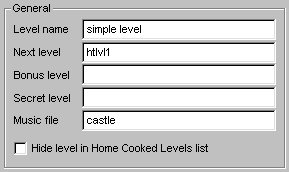
9) Finally, open the "Level properties" (in the "Tools" menu). The only thing you MUST fill in, is "Next Level". When you finish a level, the "Next Level" is started. You can fill in the filename of another level but in this case it's best to fill in the filename of this level. That way, when you finish the level it starts itself again. (You don't have to type .j2l after the name.) If you want you can also fill in the "Level name" box and the name of a music file in "Music file" box (You can use j2b, mod, s3m, xm and it files), but that's not neccesary.
10) Save the level again. But...the level isn't finished yet. So, before you "Run" the level, go through the "Layers" tutorial.
Added on: 2 June 2001 13:31. Made by Ninja Dodo.