
 |
| Event Tiles / Additional Layer Eye Candy | ||
|
This section will look at the more important must-haves each tileset should have and MUST have. There is nothing more disappointing than a great tileset without all the important stuff Jazz2 needs for level making.
|
| Event Tiles | ||
|
Event tiles are, as said before, all the important tiles Jazz2 needs for level making. Luckily for us tileset makers, not all the events are built into JCS. Just imagine what tilesets would be like if for example vines were just one unchangeable image. You wouldn’t have the freedom to choose between a jungle vine for your nature tileset, or maybe a chain for your space tileset. You also wouldn’t be able to do some really creative stuff for your tileset. In my opinion the clothesline from the official Colon tileset is the greatest idea yet for a vine, and shows just how much freedom really is given by being able to draw your own events.
Unfortunately, this freedom has a downside. When drawing a tileset Jazz2 expects you to add these event tiles to your tileset, because there is no other way they can be used. Therefore, your tileset MUST HAVE all the event tiles. No mater how pointless you think they are; there is a level maker out there that WILL need those tiles. Events are very important to Jazz2 and should never be ignored. There are also a few tiles like event tiles that are just as important, but don’t need an event to work (e.g. arrow signs). A list of these tiles are as follows:
|
| Placement of Event Tiles | ||
|
Ok, so you have all these event tiles, the important thing to remember is that events are in most cases pre-determined. That means you’re going to have to draw and place some of these event tiles in special locations in a tile. It might sound complicated, but it’s actually really easy to do. I’ll start at the top and work my way down.
|
||
 Vines: Vines are really easy to do. They’re small so they don’t need a lot of drawing attention to look good. You can place them as wherever you like on a tile, though it’s recommended to fit it directly in the middle of a tile. Most vines are around 2 pixels in height, but this can be more if you like, as long as the masked part is 2 pixels high (I’ll explain this in masking later). Vines: Vines are really easy to do. They’re small so they don’t need a lot of drawing attention to look good. You can place them as wherever you like on a tile, though it’s recommended to fit it directly in the middle of a tile. Most vines are around 2 pixels in height, but this can be more if you like, as long as the masked part is 2 pixels high (I’ll explain this in masking later).
|
||
 V and H Poles: Like vines, poles are 2 pixels wide, but once again they can be more (3 or 4 pixels) if you like. There are two important differences to poles though. Firstly, poles aren’t masked. Secondly (and more important), poles HAVE TO be placed in the middle of the tile. V and H Poles: Like vines, poles are 2 pixels wide, but once again they can be more (3 or 4 pixels) if you like. There are two important differences to poles though. Firstly, poles aren’t masked. Secondly (and more important), poles HAVE TO be placed in the middle of the tile.
|
||
 Hook: Hooks are very customisable; basically all you need is a thin horizontal area on a tile that can be grabbed onto. Think of it as a mini version of a vine. The thin middle piece you hang onto is the only piece that is masked, and is masked exactly like a vine (2 pixels high). Hook: Hooks are very customisable; basically all you need is a thin horizontal area on a tile that can be grabbed onto. Think of it as a mini version of a vine. The thin middle piece you hang onto is the only piece that is masked, and is masked exactly like a vine (2 pixels high).
|
||
 Sucker Tubes: Sucker Tubes are rarely bigger than 1 tile (32 pixels) wide, but it can be done. However, the part of the tube that is used is exactly 1 tile wide, so making it bigger isn’t worth the effort. Sucker tubes aren’t masked, although this doesn’t matter much because they are always placed in layer 3. There can be a special part of the tube made for layer 4, but because this is never really seen (it’s covered by the tube in layer 3) most people just use a plain black tile to place behind it. Sucker Tubes: Sucker Tubes are rarely bigger than 1 tile (32 pixels) wide, but it can be done. However, the part of the tube that is used is exactly 1 tile wide, so making it bigger isn’t worth the effort. Sucker tubes aren’t masked, although this doesn’t matter much because they are always placed in layer 3. There can be a special part of the tube made for layer 4, but because this is never really seen (it’s covered by the tube in layer 3) most people just use a plain black tile to place behind it.
|
||
 Text/Exit Sign: These signs are always placed on top of the platform you walk on, since Jazz needs to walk past a text sign to activate the message. These signs aren’t masked for an obvious reason. If your character has to stand in front of them to read then event, it won’t be possible when masked, so don’t mask them. That’s about all you need for a sign, as long as it’s 1 tile wide. Text/Exit Sign: These signs are always placed on top of the platform you walk on, since Jazz needs to walk past a text sign to activate the message. These signs aren’t masked for an obvious reason. If your character has to stand in front of them to read then event, it won’t be possible when masked, so don’t mask them. That’s about all you need for a sign, as long as it’s 1 tile wide.
|
||
|
|
||
 Destruct Blocks: People LOVE blowing things up (me too Destruct Blocks: People LOVE blowing things up (me too  ), destruct blocks make this possible. Each destruct block should fill exactly 1 tile and should be fully masked. Though you don’t have to fill them up completely, it is recommended, as destruct blocks are rarely used on their own, but instead in great numbers. ), destruct blocks make this possible. Each destruct block should fill exactly 1 tile and should be fully masked. Though you don’t have to fill them up completely, it is recommended, as destruct blocks are rarely used on their own, but instead in great numbers.
|
||
 Hurt Scenery: Hurt scenery (spikes, flames, anything that would hurt the player if he steps on them) is always placed on top of a platform. For a strange reason the hurt event only works when the player steps on top of it, so hurt scenery on the roof or sides of a wall won’t work at all. The part of the hurt scenery you want the player to be hurt by is always masked, so you can control exactly where you want the player to be hurt on the platform. Hurt Scenery: Hurt scenery (spikes, flames, anything that would hurt the player if he steps on them) is always placed on top of a platform. For a strange reason the hurt event only works when the player steps on top of it, so hurt scenery on the roof or sides of a wall won’t work at all. The part of the hurt scenery you want the player to be hurt by is always masked, so you can control exactly where you want the player to be hurt on the platform.
|
||
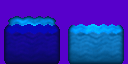 Water Block: Water blocks are useful for nature themed tilesets, but only its only purpose is eye candy. Water blocks are usually placed inside a 'ditch' in your tileset so that the character can fall in with a huge SPLASH! (Think eye candy Water Block: Water blocks are useful for nature themed tilesets, but only its only purpose is eye candy. Water blocks are usually placed inside a 'ditch' in your tileset so that the character can fall in with a huge SPLASH! (Think eye candy  ) It always comes with a part placed over itself in layer 3, but other than that there's nothing else important about it. ) It always comes with a part placed over itself in layer 3, but other than that there's nothing else important about it.
|
||
 Belts: Belts can be so much fun! That's about it though, whatever purpose they had to maybe slow the player down or speed him up is ignored because the character can easily just jump off the belt and use it as a normal platform. They're also extremely hard to draw because they need to be animated. This is also an optional event, can be fun to use but it's not crucial for game play. Belts: Belts can be so much fun! That's about it though, whatever purpose they had to maybe slow the player down or speed him up is ignored because the character can easily just jump off the belt and use it as a normal platform. They're also extremely hard to draw because they need to be animated. This is also an optional event, can be fun to use but it's not crucial for game play.
|
||
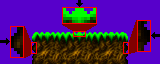 Now that you have a load of event tiles you need to find a way to place them inside your tileset. This really is as easy as it sounds, but if you want to do it using as little tiles as possible there are a few more things you should keep in mind while drawing. When you add detail by removing straight lines it becomes harder to place different blocks together, and event tiles are no exception to this. Luckily there is a fairly easy method to fix this problem. Even on jaggy tilesets there should be areas where the actual drawn platform touches the very edge of the tile. If you align your events so that they fit directly above these areas then you don't need to make any connecting tiles for events to fit with the rest of the platform. (above image is an example) I always place all my events in the middle whether they need to be or not. It’s a lot easier to place event tiles into your set when they are all at the same place in the tileset, and since poles are in the middle you should place the rest there as well to prevent overuse of event tiles.
|
| Additional Layer Eye Candy | ||
|
Layers 1, 2, 5, 6 and 7 are just about as important as layers 3, 4 and 8. But these layers are there for one reason only: Eye Candy. You might think that your tileset has enough eye candy and has no need for anything in these additional layers, but trust me, you don’t. In JCS these layers are far more customisable, and they fill up the area that would normally be occupied by layer 8 alone. While there is normally nothing wrong with how layer 8 looks, more eye candy is always better, and you should always provide as many different types of tiles possible for a level maker to work with. The background layers (5, 6 and 7) are more often used then the foreground ones (1 and 2), as any eye candy in front of the character shouldn't be overused or be too big, as it will block the player’s view of where he must go.
Remember that with anything else in your tileset your extra layer eye candy should follow the overall theme of your tileset. Everything should be in place. These layers also follow the perspective rules of the tileset (More info on that HERE). You should also show attention to detail just like your tiles in layer 4. Since these extra layers are used for eye candy alone, they shouldn’t be ugly.
|
| Quick Tips (Weather Effects) | ||
|
Even if you’re not the greatest with all the extra layer eye candy there are two really quick and easy tips I know for making some, each one using just one tile in your tileset. While these two tiles would use two background layers by themselves, it would still be a good idea to make some extra eye candy because not all people prefer the type of eye candy. These two tips are basically weather effects you can add to a level, so they wouldn’t fit into every tileset’s theme (More commonly used in nature themed tilesets).
|
| Layer 5 | |||||||||||||||||||||||||||||||||||||||||||||||||||||
|
Layer 5 can be a bit tricky to use sometimes, as it has an annoying hidden feature and can easily be misused when making levels. First and foremost, layer 5 should NOT be used as a support layer for layer 4 like layer 3 is used. It would be a complete waste of a perfectly good background layer, and you already only have three of them. If your tileset has all the tiles it needs (and it should do) then you wouldn’t need layer 5 to make some of the background eye candy. It can all be fit into layer 4 on its own.
Secondly, layer 5 has very annoying hidden properties which would make it impossible for use with tiles like rain. The layer 8 layer speeds do not work; instead it uses the values from layer 5. While this isn’t as important to level making, there is something else that is far more annoying. Whatever auto speeds you used in layer 5 will actually add to the ones used in layer 8. If you place something like rain in layer 5 the fast auto speeds will make your textured background go berserk. What’s even more annoying is that you can’t cancel out the speeds. For example, an Auto X Speed of 3 in layer 5 and Auto X Speed of -3 in layer 8 will not make the overall speed 0. Instead it will jitter violently, and can change depending on the graphics card and processor speed of the computer running the level, so don’t assume that because it doesn’t jitter when you test it someone else will have the same results. That’s it for this section, now for the short list:
|
| Drawing the Tileset | ||
|
Page 1: Drawing Methods/Feather and Blur |
||
-=Tutorials=-
[Part 1: Starting a Tileset|Part 2: Drawing the Tileset|Part 3: Making the Palette]
 Rain: Making rain in a tileset is as simple as drawing a drop of water on a single tile. However, making it work in a level is a little more complicated. While teaching people how to use JCS is not the aim of this website, I’ll give a little info so you can get the idea on how to use it. Basically you need about a 10x10 area in a background layer (not layer 5), tile its width and height and place a few of the raindrops randomly inside it. The tricky bit is next, use the auto X and Y speed in layer properties to make the rain ‘fall’ constantly.
 Lightning: Adding lightning is even easier to do. Just make a single white tile. There’s no trick involved in using it in JCS either, just make a small animation of the tile flashing and place it in a layer of it’s own.
 Page 5: Event Tiles/Additional Layer Eye Candy